DIY Primer water / Charged water

DIY Primer water / Charged water

Hi guys

I like to find inexpensive alternatives to many high end makeup products and test them. If I find them helpful or good enough I will share them with you so we can all enjoy them without spending our whole paychecks on makeup.

I have found this recipe 7 months ago and been using it on and off for 6 months. I never tried the original primer water or the charged water so this won’t be a comparison and I can’t call this a dupe but I think it’s a good primer to try if you are curious about this kind of product. It’s really easy and affordable.

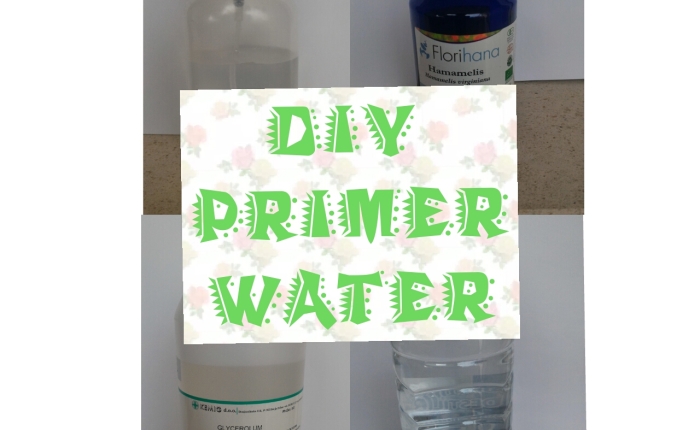
R E C I P E (120 ml = 4 oz)  Shake well before use!

a spray bottle

3 tablespoons ALCOHOL FREE Witch Hazel (reduces swelling, antibacterial)

2 tablespoons Glycerin (smoothes and hydrates)

5 tablespoons Distilled Water


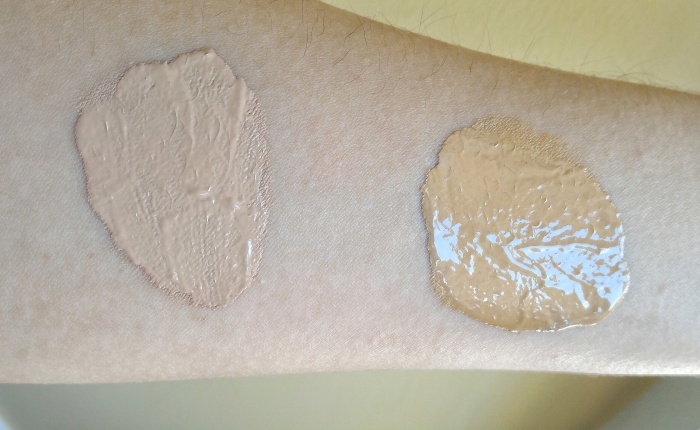
This primer is lightweight, it hydrates and smoothes the skin. It doesn’t fill in your pores but it’s great underneath heavy foundations. It prolongs my makeup for a few hours and it is important not to use too much because it can get heavy on the skin.

And that’s it! Enjoy your primer water, let me know if you tried it and did you like it. Do you want more DIYs ?

Lucy  XX


Customize Your Foundation

Customize Your Foundation

Hey guys

I have ten or so foundations in rotation through the year, but not every foundation I own is as yellow as I need it to be. So I’m going to show you how I change the undertone and shade of my foundation. It’s really simple and now you can finish all of the wrong color foundations that are sitting in your makeup drawer. Let’s begin.

CHANGING THE UNDERTONE

Food coloring

The easiest way I have found is food coloring. I only tried it with yellow so I don’t know if this works with  pink or  red color. Food coloring is cheap and very pigmented, if you add too much you will turn your foundation orange, so be careful. Some girls like to add it to the foundation bottle and then shake it well, but I like to mix the foundation and a drop of food coloring at the back of my hand and then apply it to my face. It’s your choice. Try mixing it a few times before application so you can figure out how much you need. The foundation I’m using for this tutorial is the L’oreal Paris Infallible 24 Hour Matte foundation in 20 Sand and yellow food coloring I found at home.

20160426_160049.jpg

I added too much food coloring so you can clearly see the difference.

Jpeg
This is the before and after food coloring was added (the foundation is more pink in real life)


HOW TO LIGHTEN/DARKEN YOUR FOUNDATION 

This can be achieved using pigments. Mine are from Alverde but I know The Body Shop, NYX, Manic Panic and others make them. All you need to do is add couple of drops of the right pigment to your foundation on the back of your hand and mix well.

Jpeg
These are the pigments I use


That’s all from me, I hope you liked it. Do you need to change your foundation or do you find a good match at the drugstore? Leave me a comment 🙂


Lucy XX


DIY Flower crown

13022347_10154146276664294_258780891_n
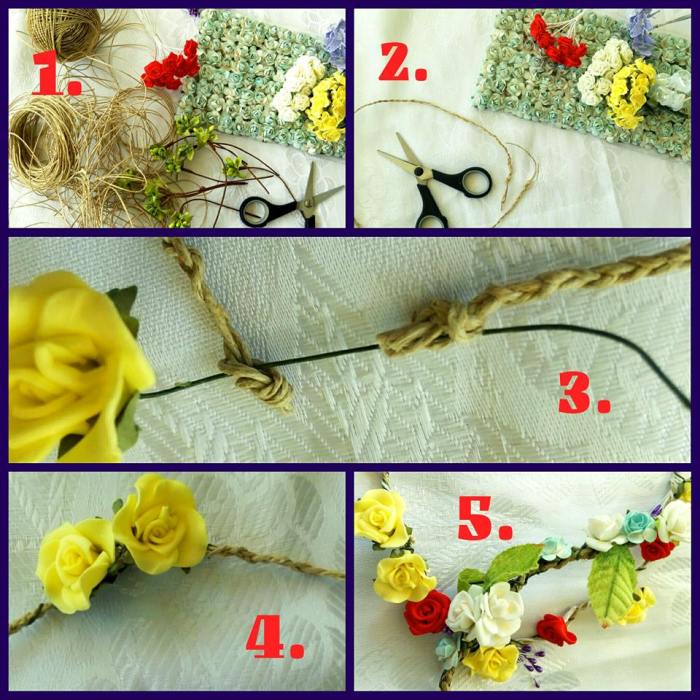
Dear fashion lovers, today I am going to show you how to make floral crown yourself. It is the perfect accessorize for upcoming, warm, spring days and music festivals. Personally I am in love with its simplicity and feminine  touch to it. There have been many tutorials made before this one, but I’m going to show you the easiest way I’ve found. No glue, sewing or mess needed. Without further ado, let’s begin.

1.You are going to need:

-Small rope

-Scissors

-Artificial flowers with wire stems. They are cheap and easy to use. I’m going to leave a link below, to buy them on Ebay. If you don’t want to buy, you can use regular plastic flowers and some thin wire. It will consume more time, but it will make beautiful floral crown.

2. Measure the size of you head. Then cut three pieces of rope in size of you head + 5 more cm (2 inches), to avoid making flower crown too small. It’s always easier to narrow a bit, then it is to make a whole new crown.

Braid the three pieces, tie the ends and cut the excess.

3. Connect two ends with wire from artificial flowers. Roll wire around rope to make it more secure.

4. Add one or two more flowers on connection for extra safety.

5. With remaining flowers, decorate as wanted. Enjoy 😉


Links on Ebay:

http://www.ebay.co.uk/itm/12Pc-1-Bouquet-15mm-Foam-Rose-ArtificIal-Flowers-With-Wire-Stems-Home-Party-Gift-/281933819713